This is the first of a multi-part post on my experience with using Flutter in-app purchases (and in this case the flutter_inapp_purchase library – using version 0.8.8+2 at the time of writing to be exact).
Initial strategy
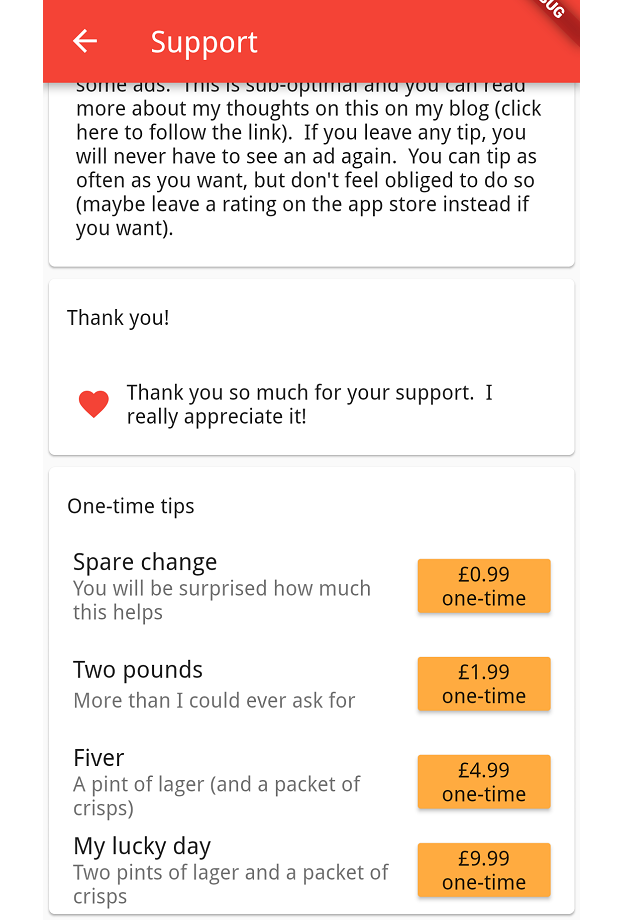
The idea around my in-app purchases was to provide my users with the ability to leave a tip. I did some rough calculations to determine some price points and settled on the following;
- One time purchases: £0.99, £1.99, £4.99 and £9.99
- Subscriptions: £0.69 per month & £4.49 per year
Of course, in my calculations I had to also keep in mind that these prices include VAT and also the respective app-store’s commission. Fees and taxes mean that I get to keep approximately 58% of these values.
Interestingly, the monthly subscription is almost similar in value to the £9.99 one-off purchase over the course of a year. It feels a bit cheaper.
Setting up
First off, I had to set up all of the purchases in the app stores – I started following this guide created by the library creator: Flutter In App Purchase on Medium. I set everything up in the Google App store first. It was a bit annoying, because the values you have to enter are the pre-tax values, so £0.99 becomes £0.83.
All my one-off tips are set up as consumable items, because I want to give people the ability to tip as many times as they want.
I actually also setup my Amazon too, but I don’t even know why. Both were relatively straight-forward so I figured Apple would be easy and proceeded to set it up without following the guide (mistake!).
Android setup
Coding it
Coding it was relatively straight-forward, pass a list of ID’s and get details of the in-app purchases. I then sort it in value order and display the details from the app store in my app.
While I was looking at how to handle subscriptions on Google Play, I decided to leave it alone for a while since it seemed slightly complex.
Testing it
I develop and test using Android first. Initially, I kept getting a PlatformException (responseCode: 3). This took me about an hour to figure out that in-app purchases don’t work on emulators. Switched to a real device and it worked quite well.
Since I wanted to make sure that I could easily change descriptions, text and prices of my items, I display all the data from the app store. Google adds in my app name into the description, so I have to strip this out again, otherwise it looks a bit ugly.
I also manage to figure out how to test with nearly real purchases. Google actually makes it quite easy to test. The only issue is, due to my implementation, if you’ve ever bought something successfully, I’ll automatically disable ads – this might become an issue in future, so I will have to figure out a way around this for my test devices. In the meantime, I decided to just test the “declined” or “cancelled” path so that I don’t disable ads forever on my test device.
The code route for disabling the ads is what I use in my pro version, so I was happy that it was safe to publish.
Publishing it
It all looked good on Android and I felt ready to publish. Apart from the emulator problem which was a bit of a hassle, it seemed relatively painless. I started the roll out and waited for the tips to roll in!
Republishing it
For whatever reason, I decided to test the purchase flow and approved purchase – just to double check. Argh! Yes, I use the same flow as I do for my pro version, but I don’t turn off the ads after being turned on in my pro version. After tipping, the ads are turned off, but the app left an ugly which space where the ad used to be – not what I wanted to happen!
Quickly fixed it and republished. And then waited…
First purchase
My first tip (which wasn’t the “test one” I did in production), came in a day later. It was a bit surreal – I actually felt bad for receiving a tip. That probably deserves an entirely separate post to explain. Either way, it seemed to be fine. I have money and it all worked fairly easily.
Apple setup
Android was straight-forward. I generally followed the guide and it was a bit easier than I thought it would be. I basically just copied what I had done for Android, but then it seems like I would be unable to test it.
When you first create in-app purchases for Apple, they go into “Waiting for review” and they will be approved when you submit your first binary which uses them.
First mistake
I setup all my in-app purchases to have the same ID’s across Android and iOS. This made the code a bit easier, but I think this might be wrong. I just used generic ID’s (smalltip, mediumtip, largetip, hugetip). All the examples for Apple suggest to use reverse domain names with the ID’s appended to the end, but these always appear as suggestions, just saying they have to be unique. Now I’m not clear, unique how? Unique across the entire app store or just unique for myself. I figured since I created it already, I’d just go with it.
Submitting in-app purchases for approval
So, I figured since my in-app purchases were not yet available, I could not test them until they were approved. My best chance to get them approved, would be to just submit my app.
My in-app purchases kept showing missing metadata. Apparently, you have to submit a screenshot showing the in-app purchases. This is difficult since they aren’t available yet. It felt like a chicken and egg situation, but I already had that figured out with Android, so I just took a screenshot of that and attached it to all my in-app purchases.
Half a day after submitting, I checked back and noticed that the in-app purchases were still not waiting for review. I went searching and saw that you have to submit the in-app purchases at the time that you submit your binary – it doesn’t just do it together.
Cancelled the submission, lost half a day and tried again, this time with all of the in-app purchases attached.
Failure
My submission was rejected. Together with a screenshot showing that no purchases are available (as my app does when it cannot find anything).
What next?
I am going to redo everything for Apple. I’m going to try and test it and see if anything will actually appear, but if it works like Android did, I’m going to have to do it blindly. I am just hoping that creating truly unique ID’s will sort everything out. Otherwise, I don’t know – maybe I’m going to have to go and buy myself a cheap iPhone to use for testing.
If this ever works, I’ll post a second part. Until then, assume I’m trying to figure out how to get it to work!